This site contains affiliate links. We may earn a commission if you purchase through our links at no extra cost to you. All opinions are our own. Learn more.
Getting a clutch replaced at a shop isn’t cheap. Labour alone runs $400-$800 depending on the vehicle and your location — and that’s before the cost of parts. For a mid-range OEM clutch kit at $200-$300, a shop job quickly climbs to $700-$1,200 total.
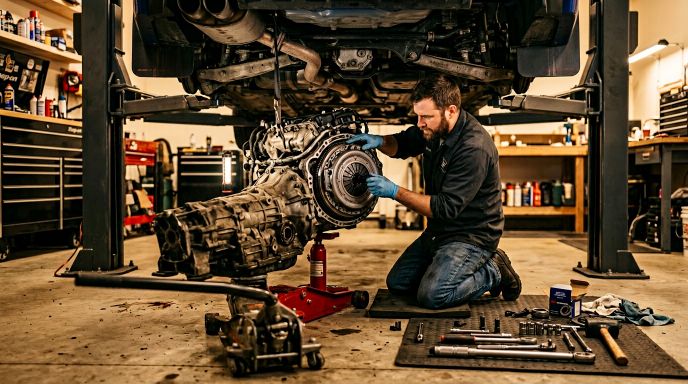
If you have a garage, a set of jack stands, and a free weekend, replacing a clutch yourself is one of the most rewarding — and financially smart — jobs a home mechanic can tackle. It’s not the easiest job a beginner will attempt. Dropping a transmission requires patience, organisation, and proper safety setup. But it is absolutely achievable with intermediate mechanical experience.
If you’ve done brake jobs, suspension swaps, or timing belt work, you have the skills to replace a clutch. This guide walks you through every step, from draining the transmission fluid to torquing the pressure plate in the correct sequence. We’ve included a complete tool list with real prices, common mistakes to avoid, and a full break-in procedure for your new clutch. Safety note: Always use rated jack stands. Never work under a vehicle supported only by a floor jack.
Before You Start — Is This a DIY Job?
This is the right job for you if: You’ve done suspension work, brake jobs, or complex engine work before. You have access to a floor jack, 4 jack stands, and ideally a transmission jack (can be rented from AutoZone/O’Reilly for free). You have a full socket set (metric and SAE), torque wrench, and 8-14 hours available.
This is NOT the right job if: You’ve never done mechanical work before. You don’t have rated jack stands (not working under a car on a single floor jack — this is non-negotiable for safety). You have a newer vehicle with a DSG, DCT, or automated manual — these require specialist equipment.
When to hire a pro: Vehicles over 10 years old may have rusted transmission bolts. RWD trucks and performance cars often have more complex drivetrain removal. If you strip a bell housing bolt or damage a driveshaft seal, repair costs exceed what you saved.
Tools You’ll Need for Clutch Replacement
| Tool | Purpose | Approx. Cost | Where to Buy |
|---|---|---|---|
| Floor Jack (2-3 ton) | Lift vehicle | $50-$150 | Amazon / Harbor Freight |
| Jack Stands (×4, rated) | Support vehicle safely | $30-$80 | Amazon / Auto parts store |
| Transmission Jack | Support and lower transmission | $80-$200 (or FREE rental) | Amazon / Tool rental |
| Clutch Alignment Tool | Centre disc during installation | $8-$45 | Amazon |
| Torque Wrench (1/2″ drive) | Torque pressure plate bolts to spec | $40-$120 | Amazon |
| Socket Set (metric + SAE) | Remove transmission bolts | Own or $60-$120 | Amazon |
| Breaker Bar | Break loose rusted bolts | Own or $20-$40 | Amazon |
| Drain Pan | Catch transmission fluid | $10-$20 | Amazon |
| Penetrating Oil | Free stuck bolts | $8-$15 | Amazon / Walmart |
| Brake Cleaner | Clean flywheel surface | $5-$10 | Amazon / Walmart |
| Safety Glasses + Gloves | Personal safety | Own | — |
| Anti-Seize | Apply to bell housing bolts | $8-$15 | Amazon |
| High-Temp Grease | Apply to throwout bearing contact | $8-$12 | Amazon |
| Pry Bars (2) | Free transmission from engine | Own or $15-$30 | Amazon |
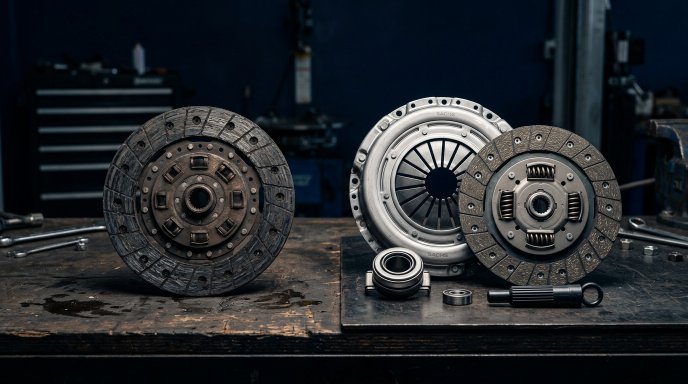
Parts You’ll Need
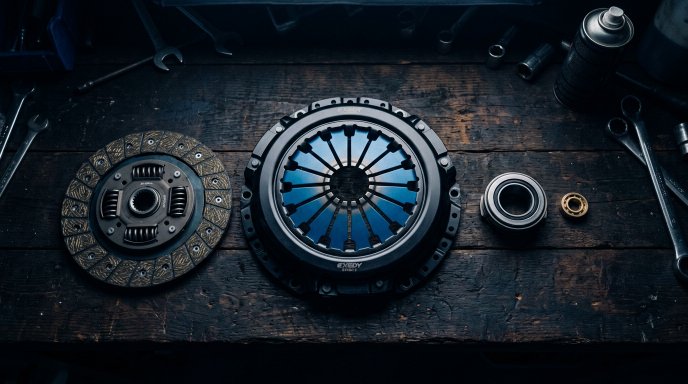
Always replace as a complete kit: disc, pressure plate, throwout/release bearing. While you’re in there, also replace: pilot bearing (press-fit into crankshaft, $5-$15), rear main seal if it shows any seepage ($15-$30). These parts are cheap — labour to access them is expensive. Do it all at once.
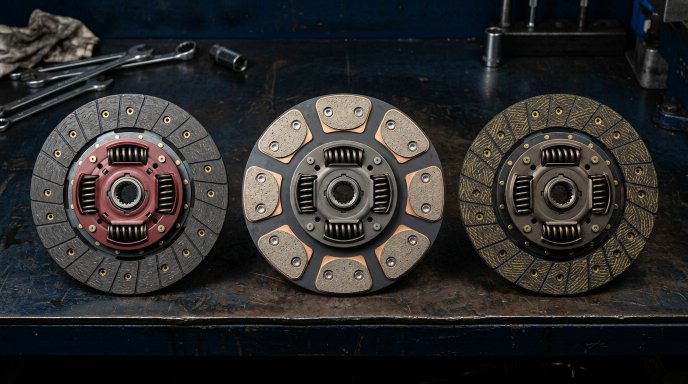
Organic vs Ceramic vs Kevlar Clutch Plates: Which Material Is Right for Your Car?
Step-by-Step Clutch Replacement Guide
Note: These steps apply to most FWD and RWD manual vehicles. Specific vehicles may vary — always consult your factory service manual.
STEP 1: Safety Setup and Vehicle Preparation
Park on a flat, hard surface. Engage the parking brake and chock both rear wheels. Disconnect the negative battery terminal. Gather all tools before starting. If the transmission uses a drain plug, have your drain pan ready. ⚠️ CAUTION: Never perform this job on gravel, dirt, or an incline. An unstable vehicle under a transmission jack is a serious safety hazard.
STEP 2: Drain the Transmission Fluid
Locate the transmission drain plug (check your service manual). Position your drain pan and remove the plug. Allow to drain fully — typically 5-10 minutes. Re-install the drain plug loosely (torque to spec after reassembly). 💡 Pro Tip: Now is a good time to purchase fresh transmission fluid. Many Hondas use Honda MTF, Toyotas use Toyota Gear Oil — always use the manufacturer-specified fluid, not generic gear oil.
STEP 3: Raise and Support the Vehicle
Use your floor jack on the factory jack points and raise the vehicle high enough to work comfortably underneath. Place 4 rated jack stands under proper support points. Lower the vehicle onto the jack stands and give it a firm shake to confirm stability before crawling underneath. ⚠️ CAUTION: Never rely on a floor jack alone. Jack stands rated for your vehicle’s weight are mandatory.
STEP 4: Remove the Driveshaft (RWD) or Axle Shafts (FWD)
FWD vehicles: Remove the CV axle shafts from both sides of the transmission. Have your drain pan ready — transmission fluid will spill from the axle ports. Plug the ports with shop rags to prevent fluid loss. RWD vehicles: Mark the driveshaft and differential flange alignment before removal (chalk or paint pen). Remove the driveshaft and tie it safely out of the way. 💡 Pro Tip: Take photos of every electrical connector, hose routing, and cable before disconnecting anything. Your future self will thank you during reassembly.
STEP 5: Support the Transmission
Position your transmission jack under the transmission’s centre of gravity. Use the jack’s straps or safety chain to secure the transmission — you do NOT want it dropping unexpectedly. Raise the jack until it just contacts the transmission pan. ⚠️ CAUTION: A transmission can weigh 50-150 lbs depending on the vehicle. An unsecured transmission falling is a serious injury risk.
STEP 6: Disconnect Transmission Linkages and Mounts
Disconnect: the shifter linkage, the clutch hydraulic line or clutch cable (depending on your vehicle), all electrical connectors (reverse switch, speed sensor), the exhaust bracket if attached to the transmission, and any transmission crossmember or rear mount bolts. Support the rear of the engine with a jack stand under the oil pan (use a block of wood to distribute the load).
STEP 7: Remove Bellhousing Bolts and Lower the Transmission
With all linkages disconnected and the transmission supported, remove the bellhousing bolts. These are typically 12-17mm bolts arranged around the perimeter of the bellhousing flange. Work in a star pattern and keep track of different bolt lengths — they’re not always identical. Carefully slide the transmission straight back until the input shaft clears the pilot bearing. Lower the transmission on the jack and roll it clear. 💡 Pro Tip: If the transmission won’t separate from the engine, DO NOT pry aggressively at the mating surface. Check for hidden bolts (starter motor bolts often pass through the bellhousing), and check that the input shaft is fully disengaged from the pilot bearing.
STEP 8: Remove the Pressure Plate
With the transmission out, you now have access to the clutch. Remove the pressure plate bolts in a DIAGONAL STAR PATTERN — never in a circle. This prevents warping the pressure plate from uneven release tension. Loosen each bolt 1-2 turns at a time, working around the pattern, until spring tension is fully released. Then remove the bolts completely and lift off the pressure plate and clutch disc together. ⚠️ CAUTION: The clutch disc will fall free when the last bolt is removed — hold it or have someone steady it.
STEP 9: Inspect and Resurface the Flywheel
With everything removed, clean the flywheel surface with brake cleaner and inspect it carefully. Look for: deep grooves (finger-catch test — if you can catch your fingernail in a groove, it needs attention), heat cracks (hairline cracks radiating from the centre), hot spots (hard, glassy patches that look lighter than surrounding metal), and heavy scoring. Light heat discoloration (bluish tint) is normal. Deep grooves or cracks require resurfacing ($40-$80 at a machine shop) or replacement. 💡 Pro Tip: A warped or grooved flywheel will destroy a new clutch disc in 10,000-20,000 miles. A $60 resurface now saves you from a repeat clutch job in 2 years.
STEP 10: Install the New Clutch Disc Using the Alignment Tool
THIS IS THE MOST CRITICAL STEP. The clutch disc must be perfectly centred in the pressure plate before you torque it down — or the transmission input shaft won’t slide in during reassembly. Insert the clutch alignment tool through the centre of the new disc and into the pilot bearing in the crankshaft. Hold the disc against the flywheel, making sure the CORRECT SIDE faces the flywheel (most discs are marked “flywheel side” or “transmission side”). Do NOT touch the friction surface with bare hands — skin oils degrade the friction material. ⚠️ CAUTION: Using the wrong spline-count alignment tool (e.g., a 20-spline tool on a 22-spline disc) will leave the disc off-centre. Always match the alignment tool to your specific disc.
STEP 11: Install and Torque the Pressure Plate
Place the pressure plate over the disc, aligning the bolt holes. Thread all bolts in by hand first. Then torque in a diagonal star pattern in 3 passes: first to 5 ft-lb, then 10 ft-lb, then final torque (typically 12-20 ft-lb for most vehicles — consult your service manual). Remove the alignment tool only after all bolts are fully torqued. 💡 Pro Tip: Apply a thin film of high-temp grease to the throwout bearing contact surface on the input shaft collar. Do NOT get any grease on the disc face or flywheel surface.
STEP 12: Reassembly and Break-In
Re-install the transmission by sliding it carefully onto the dowel pins and guiding the input shaft into the pilot bearing. Do NOT use transmission bolts to pull the transmission toward the engine — if it’s binding, something is misaligned. Reconnect all linkages, mounts, axle shafts/driveshaft, and electrical connectors in reverse order. Refill the transmission with the correct fluid to the correct level. Bleed the clutch hydraulic system if applicable. Start the engine and test clutch engagement before lowering the vehicle. Follow the break-in procedure below before any hard driving.
How Long Does a Clutch Replacement Take?
| Skill Level | Time Estimate | Notes |
|---|---|---|
| Complete Beginner | 12-16 hours | First time dropping a transmission; expect surprises |
| Intermediate (1-2 prior trans jobs) | 6-10 hours | Familiar with the process |
| Experienced (3+ trans jobs) | 3-5 hours | Smooth process, knows the shortcuts |
| Professional Shop | 2-4 hours | With lifts and air tools |
DIY vs. Shop: Cost Comparison
| Cost Element | DIY | Shop |
|---|---|---|
| Labour | $0 (your time) | $400-$800 |
| OEM Clutch Kit | $130-$280 | $130-$280 |
| Performance Clutch Kit | $250-$600 | $250-$600 |
| Flywheel Resurface | $40-$80 | $60-$120 |
| Total (OEM Kit) | $170-$360 | $590-$1,200 |
| Total (Performance Kit) | $330-$680 | $750-$1,520 |
| Potential Savings | — | $420-$840 |
5 Most Common Clutch Replacement Mistakes
MISTAKE 1: Not Using the Clutch Alignment Tool
This is the single most common cause of a failed clutch installation. Without the alignment tool, the disc sits off-centre. When you try to slide the transmission back in, the input shaft won’t align with the pilot bearing, and you’ll end up fighting the transmission for hours — or worse, forcing the input shaft in at an angle and damaging the disc. Always use the correct alignment tool, and always leave it in place until the pressure plate is fully torqued.
MISTAKE 2: Not Resurfacing or Replacing the Flywheel
Installing a brand-new clutch disc against a grooved or heat-damaged flywheel is a guaranteed way to shorten clutch life. The new friction material will wear unevenly, the disc will vibrate during engagement, and you’ll be back doing this job in 20,000-30,000 miles. Flywheel resurfacing is $40-$80 at any machine shop. It’s not optional — inspect the flywheel every time.
MISTAKE 3: Getting Grease or Oil on the Disc Friction Surface
Even a fingerprint on the clutch disc friction material can cause clutch slippage and chatter. The organic or ceramic friction material is porous and absorbs oil instantly. If you contaminate the disc, it cannot be cleaned — you need a new disc. Handle the clutch disc only by the edges, and never let it contact a surface with oil residue. Spray the flywheel and pressure plate face with brake cleaner before installing the new disc.
MISTAKE 4: Skipping the Break-In Procedure
A new clutch disc needs to be heat-cycled and seated against the flywheel before it can handle full-load use. Drive the first 500 miles gently — normal city driving, smooth engagements, no hard launches, no high-RPM power shifts. Skipping break-in can glaze the friction surface and cause slipping or shudder that never fully goes away without another replacement.
MISTAKE 5: Not Replacing the Pilot Bearing and Rear Main Seal
The pilot bearing (press-fit into the crankshaft) guides and centres the transmission input shaft. If it fails, the input shaft wobbles, causing vibration, disc chatter, and premature bearing wear throughout the drivetrain. It costs $5-$15 and takes 10 minutes while the flywheel is already off. Similarly, if the rear main seal shows any seeping, replace it now. You’ll never have easier access — and a leaking rear main seal will contaminate your new clutch disc quickly.
New Clutch Break-In Procedure
The break-in procedure ensures the new friction disc seats evenly against the flywheel and pressure plate, developing uniform contact and preventing hot spots. Follow this procedure regardless of clutch material:
FIRST 50 MILES:
- Drive at normal city speeds (25-45 mph)
- Perform 5-6 firm (but not panic) stops from 30 mph — this creates controlled heat cycles
- Avoid stop-and-go gridlock traffic if possible (excessive clutch slipping in slow traffic creates unwanted heat)
- No hill starts that require extended clutch slipping
MILES 50-500:
- Normal city and highway driving
- Smooth, progressive clutch engagement
- Avoid hard launches (no clutch dumping, no spinning tyres from standstill)
- No towing or heavy loads
- Avoid riding the clutch pedal
AFTER 500 MILES: The clutch is fully seated. You can now drive normally, including spirited driving, track days (if appropriate), and normal towing loads.
When to Call a Professional
Consider hiring a shop if: The vehicle is an exotic or sports car with a mid-engine layout (Porsche, Ferrari) — access is dramatically more complex. Your vehicle has a wet clutch or DCT/automated manual (not a standard DIY job). You’ve attempted the job and discovered severe corrosion on bellhousing bolts that are stripping. You don’t have access to a transmission jack and the vehicle is a heavy truck (transmission weighs 100+ lbs). The flywheel bolts are seized from rust and require specialist tools to extract safely.
Products Used in This Guide
| Product | Use |
|---|---|
| Clutch Alignment Tool Set (11pc) | Centre disc during install |
| Torque Wrench 1/2" drive | Torque pressure plate |
| Full OEM Clutch Kit (Honda Civic) | Complete clutch replacement |
| Full OEM Clutch Kit (Toyota Tacoma) | Complete clutch replacement |
Frequently Asked Questions — Clutch Replacement
Q1: How much does it cost to replace a clutch yourself?
DIY clutch replacement typically costs $130-$350 for an OEM kit, $40-$80 for flywheel resurfacing, and whatever tools you don’t already own. Total DIY cost is typically $200-$450, compared to $600-$1,200 at a shop — a saving of $400-$800.
Q2: Do I absolutely need a transmission jack?
For most vehicles, yes. A transmission weighs 50-150 lbs and sits at an awkward angle. Trying to lower it using floor jacks and creative muscle work is dangerous and almost always results in damage to transmission seals, axle shafts, or yourself. A transmission jack rental from AutoZone or O’Reilly is free with a deposit — there’s no excuse not to use one.
Q3: Should I replace the flywheel or just resurface it?
Resurface if the flywheel has light wear — grooves less than 1mm deep, minor heat discoloration, no cracks. Replace entirely if there are deep grooves, cracks, severe hot spots, or if the flywheel is at minimum thickness. A new flywheel for most economy cars is $80-$200 — sometimes worth it over resurfacing an old, heavy unit.
Q4: How do I know if my flywheel needs resurfacing?
Run your fingernail across the flywheel friction surface. If your nail catches in a groove, resurface or replace. Also look for hard, shiny or discoloured patches (hot spots), cracks radiating from bolt holes or the centre, and visible step wear at the outer edge of the friction surface. When in doubt — resurface. It’s cheap insurance.
Q5: What is the break-in procedure for a new clutch?
Drive gently for the first 500 miles. In the first 50 miles, perform 5-6 firm stops from 30 mph to create heat cycles. Avoid hard launches, towing, and sustained clutch slipping. After 500 miles, the clutch is fully seated and can be used normally. Ceramic clutches require additional heat cycles — refer to the manufacturer’s specific break-in instructions.
Conclusion — Ready to Save $400-$800?
Replacing a clutch at home is one of the most rewarding jobs a home mechanic can complete. With the right tools, a methodical approach, and this guide as your reference, you’ll have a fresh clutch installed and properly broken in for a fraction of what a shop charges. The most important things to remember: use the alignment tool, inspect the flywheel, keep oil off the disc, and follow the break-in procedure. Get these four things right, and your new clutch will outlast the last one.
Ready to order your parts? Jump to our vehicle-specific guides: “Best Clutch Kit for Honda Civic“